Set Up Paddle Payment (Paddle Billing) - CodePopular
🚀 Before You Begin
To get started, you must have a Paddle account that is fully verified. This ensures that all plugin features work seamlessly and without interruptions.
If you don’t have an account yet, visit Paddle’s official Registration page, create your account, and complete the verification process. Once verified, you’ll be ready to unlock the full potential of the WooPaddle plugin and enjoy a smooth, hassle-free experience.
Step 1: Enable Paddle Billing API
If you want to use Paddle’s modern Billing API—recommended for advanced subscription management, customer portals, usage-based billing, and improved security—you must enable the Paddle Billing API option inside WooPaddle.
Follow the steps below to set it up correctly.
1. Open the WooPaddle Settings Page
- Log in to your WordPress Admin Dashboard.
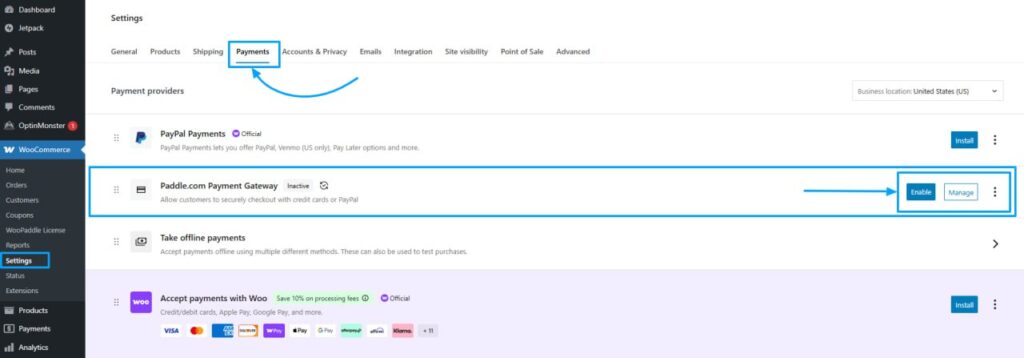
- Navigate to WooCommerce → Settings → Payments
- Find Paddle.com Payment Gateway in the list
- Click Manage to configure the payment gateway
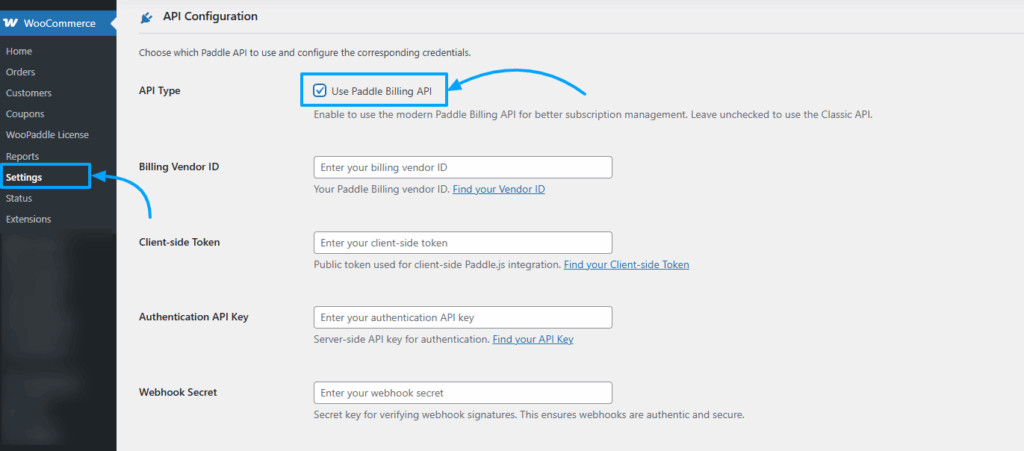
- Scroll to the API Configuration section.
2. Enable Paddle Billing API
At the top of the API Configuration panel, you will see:
API Type → Use Paddle Billing API
- Check this option to enable the Paddle Billing API.
- Leaving it unchecked will use the Classic API instead.
Enabling this option switches WooPaddle to use Paddle’s modern Billing platform, providing better subscription handling and more robust APIs.
Step 2. Enter Your Paddle Billing Credentials
Once the Paddle Billing API is enabled, several required fields will appear:
- Authentication API Key
- Client Side Token
- Webhook Secret
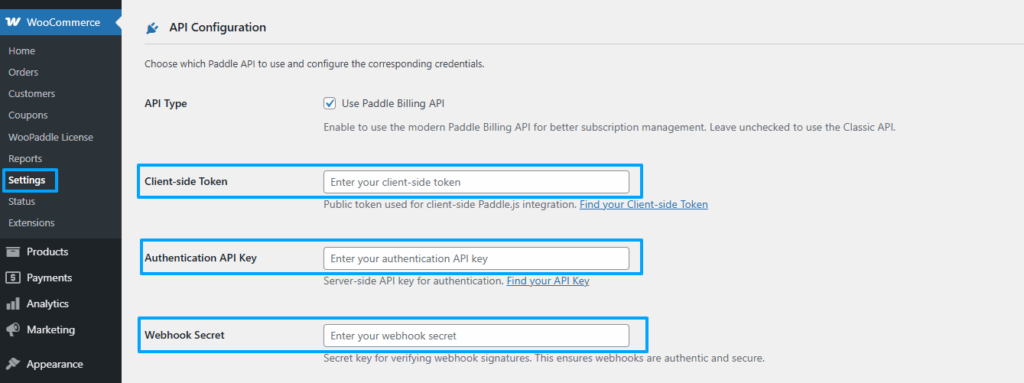
Here is the step-by-step guide to get all the Credentials
1. Get the Authentication API Key
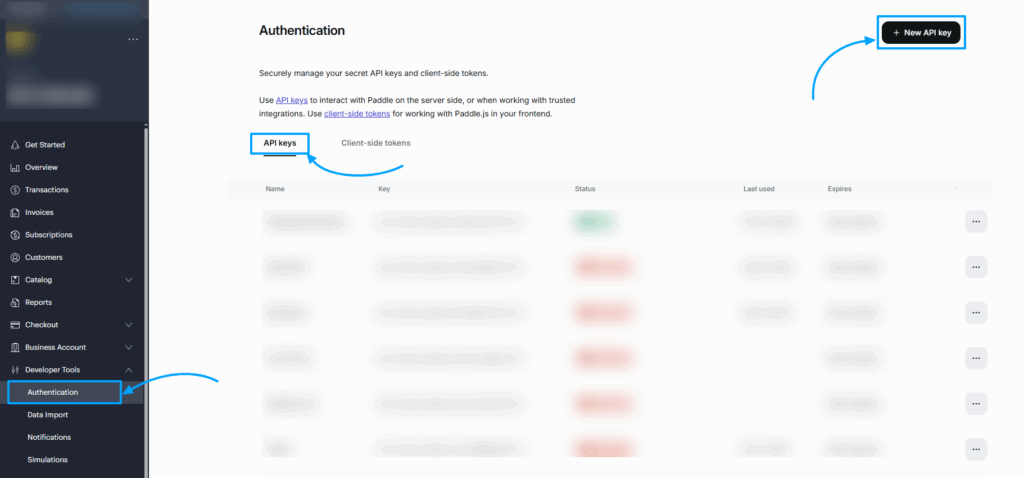
- Log in to your Billing Paddle Vendor Dashboard
- Navigate to Developer Tools→ Authentication
- In the authentication page, you will see all API keys
- And on the Right side, you will get a button to create a new API Key, just click on the button (New API key)
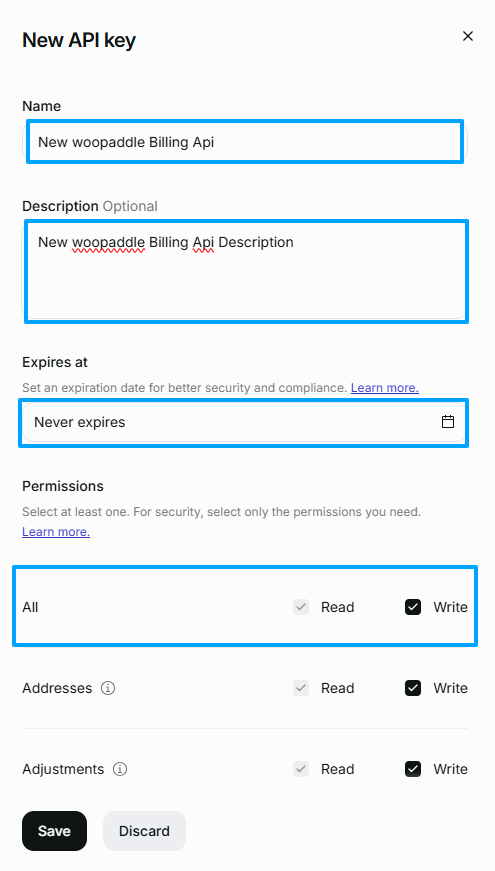
- After clicking the New API key button, you will get a pop-up and fill up all the information
- Put a new api key name (Required)
- And put an api key description, which is optional
- Set Expires to “Never Expires”
- Set Permissions All Read & Write (Checked read & write permission)
- Click on the Save button
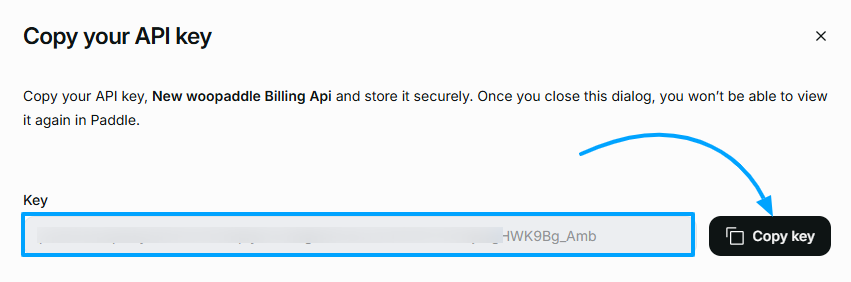
After clicking the save button, your API key will be created. → Copy your API key
2. Get the Client-side tokens
To get Client-side tokens, similar to the authentication key, follow the steps to get the client-side tokens
- Navigate to Developer Tools→ Authentication
- In the authentication page, click on the Client-side tokens option, and you will see all the Client-side tokens.
- And on the Right-Top side, you will get a button to create a New Client-side token. Just click on the button (New Client-side token)
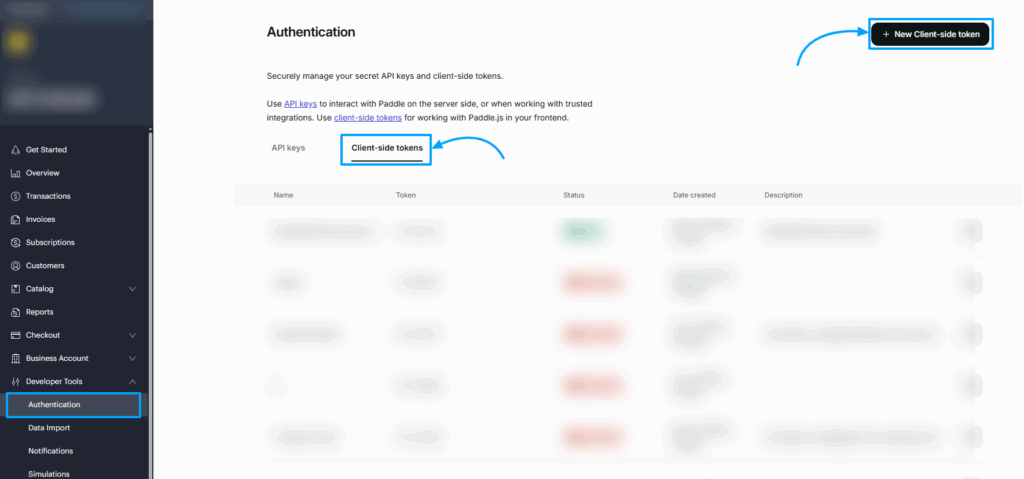
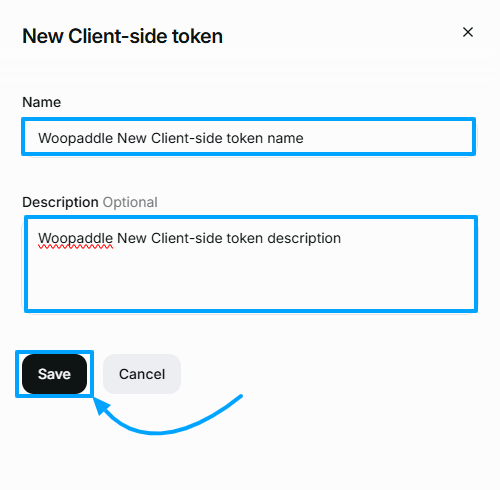
After clicking the New Client-side tokens button, you will get a pop-up and fill up all the information
- Use a Client-side token name that is required
- And also an optional Client-side token description
- After putting all the information, click on the Save button
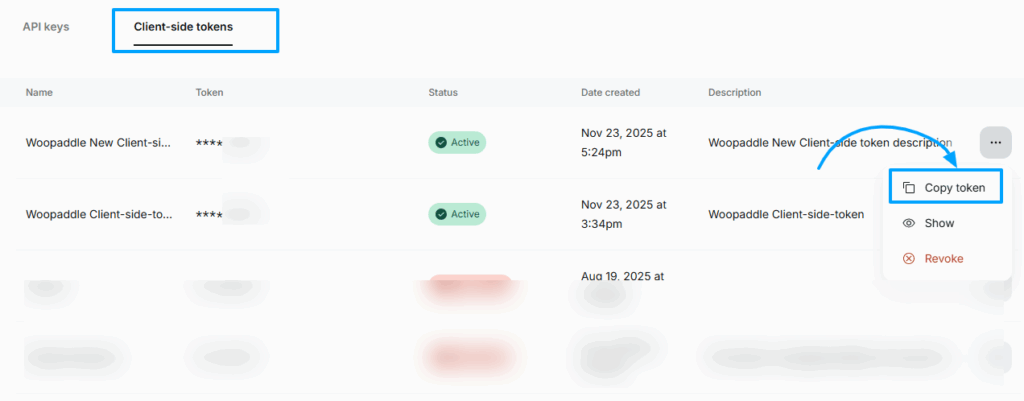
After clicking the save button, your Client-side tokens will be created. → Click on the 3-dot icon to get the token. → After clicking the 3-dot menu, you will get options to copy the token and show the token. → From there, copy the token
3. Get the Webhook Secret
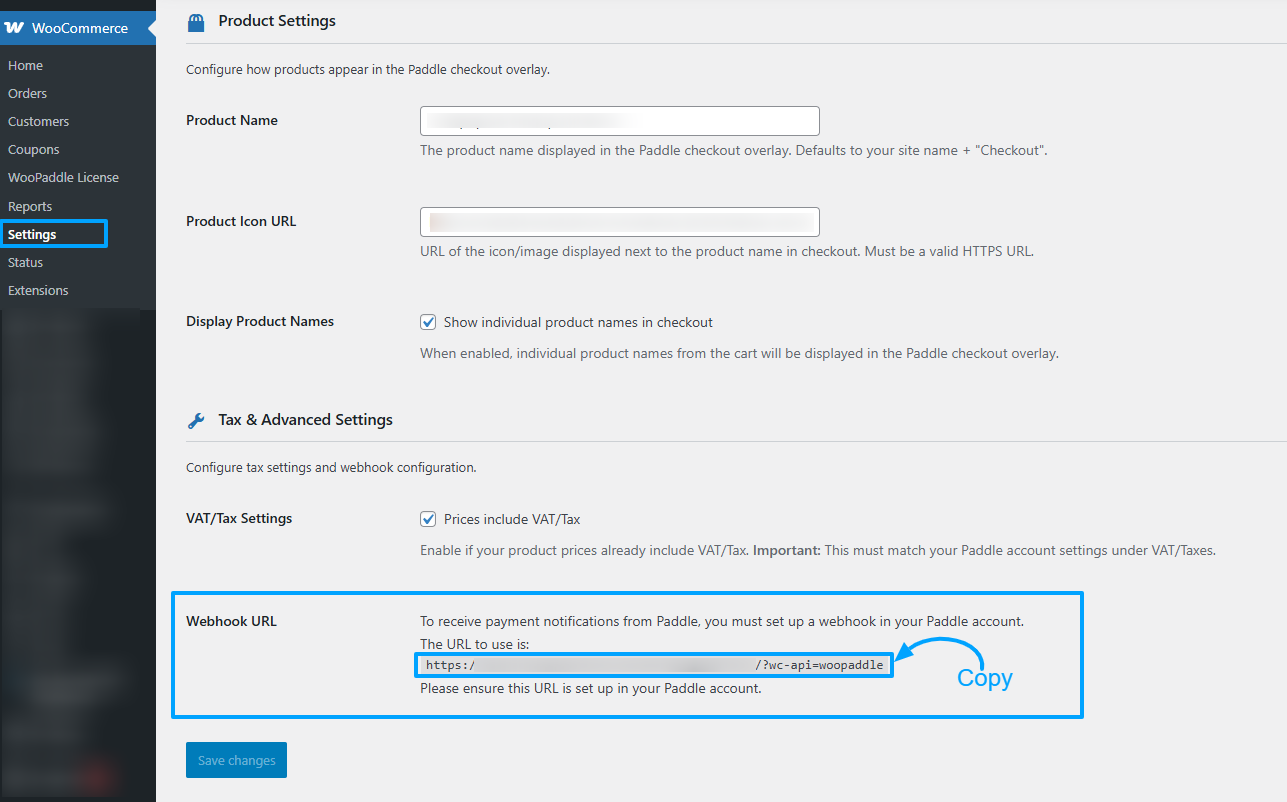
Before getting the webhook secret, you need the webhook URL. Here is the step to get the webhook URL
- Log in to your WordPress Admin Dashboard.
- Navigate to WooCommerce → Settings → Payments
- Find Paddle.com Payment Gateway in the list
- Click Manage to configure the payment gateway
- Scroll to the Tax & Advanced Settings section.
- In the Tax & Advanced Settings settings, you will get the webhook URL, which will look like (yourdomain.com/?wc-api=woopaddle)
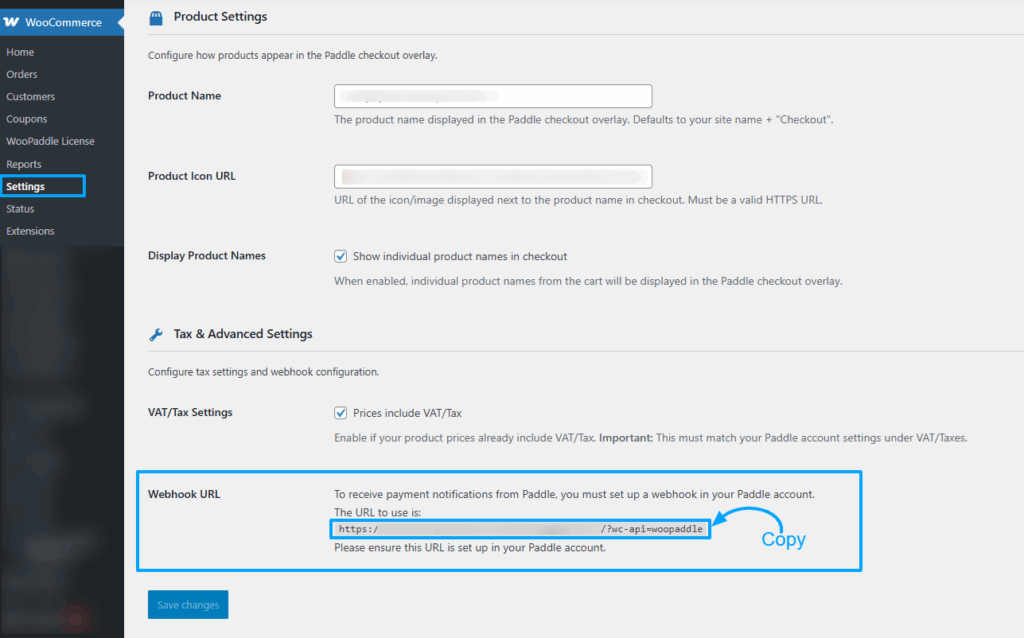
After copying the webhook URL, you can create the webhook secret by following the steps
- Log in to your Billing Paddle Vendor Dashboard
- Navigate to Developer Tools→ Notifications
- In the Notifications page, you will see all Notifications
- And on the Right side, top corner, you will get a button to create a New destination. Click on the button (New destination)
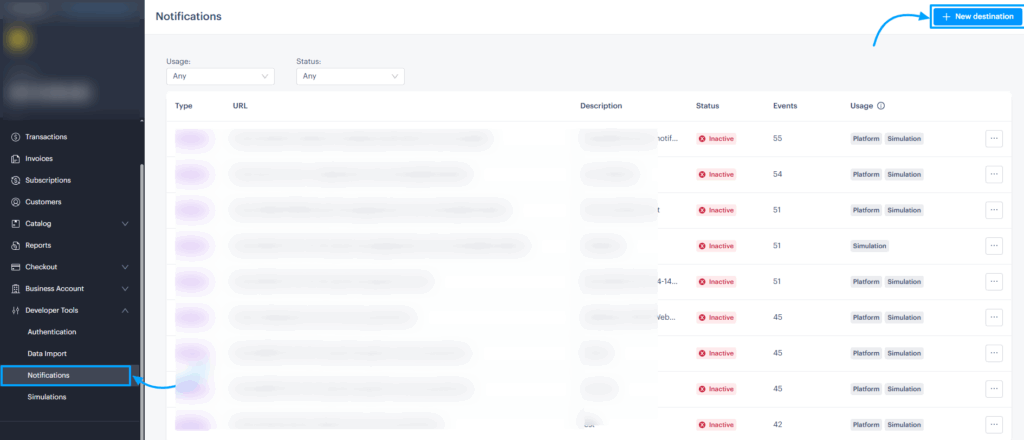
After clicking the New destination button, you will get a sidebar and fill up all the information
- Set destination description (Required)
- Example: Woopaddle Payment notification
- Set Notification type (Webhook)
- Set URL. This URL is the webhook URL that you have copied before from the payment configuration page to get the webhook url from here
- Example Webhook URL: https://yourwebsite.com/?wc-api=woopaddle
- API Version Select 1
- Usage type Platform and Simulation
- Events: Click on Select all events
- And click on the save destination button
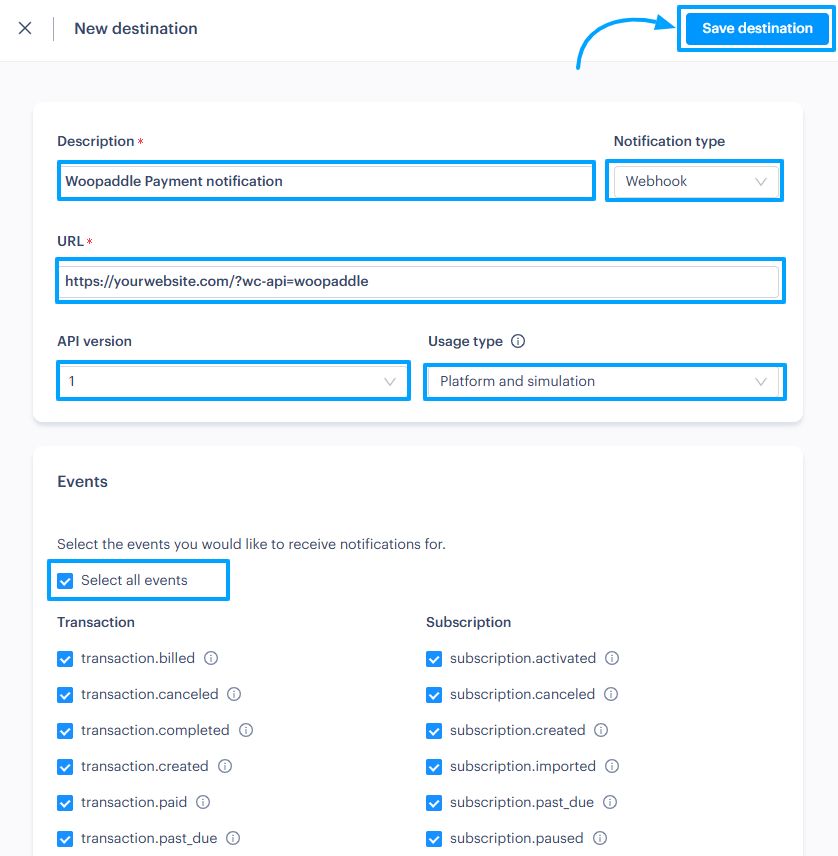
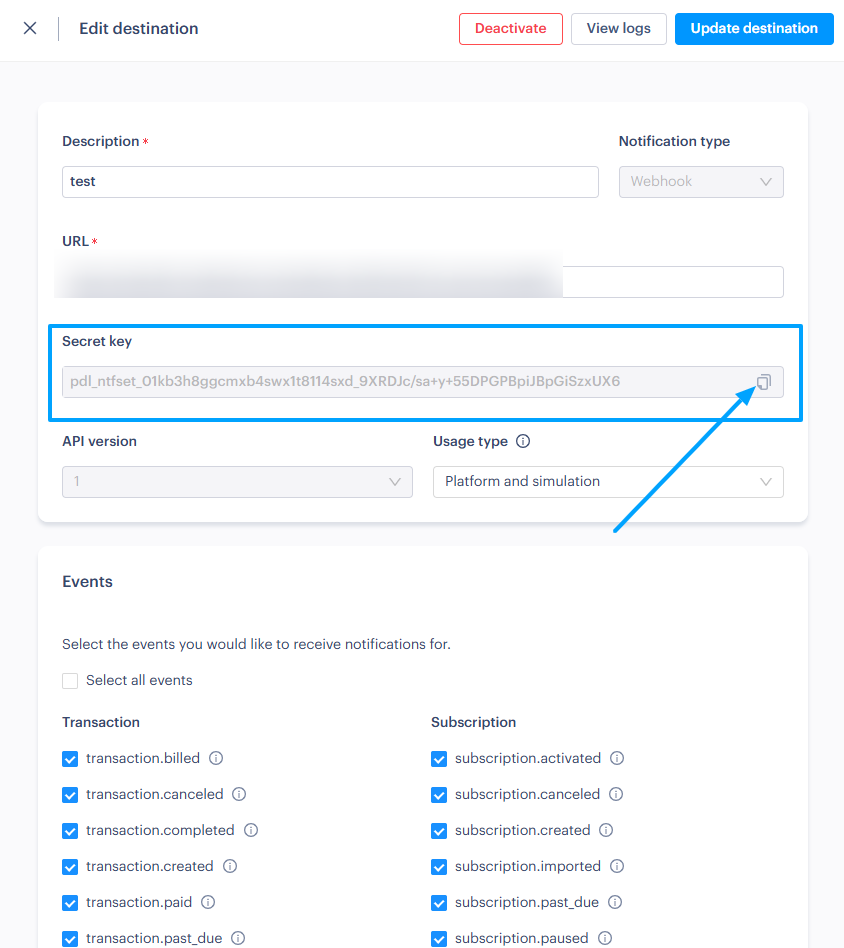
After clicking the save destination button, your Webhook Secret ID will be created. → Click on the 3-dot icon and edit the destination to get the Webhook Secret ID. → After clicking the edit button, you will get options to copy your Secret ID. → From there, copy your Webhook Secret ID
Final Step: Adding Paddle API Credentials in WooPaddle
Once you have collected your Paddle credentials ( API Key, Client-side Token, and Webhook Secret) from your Paddle dashboard, follow the steps below to configure them inside WooPaddle:
1. Paste Your Authentication API Key
- Locate the Authentication API Key field.
- Paste your Paddle API Key in the Authentication API key field.
- This key is used to authorize all server requests between WooPaddle and Paddle.
2. Paste Your Client-side Token
- Find the field labeled Client-side Token.
- Paste your Paddle Client-side Token into this box.
- This token is required for Paddle.js and secure checkout initialization.
3. Add Your Webhook Secret
- Find the Webhook Secret field.
- Paste your Webhook Secret copied from Paddle.
- This ensures WooPaddle can verify incoming webhooks and process orders, renewals, and subscription events securely.
4. Save Changes
Scroll to the bottom and click Save Changes to apply your configuration.
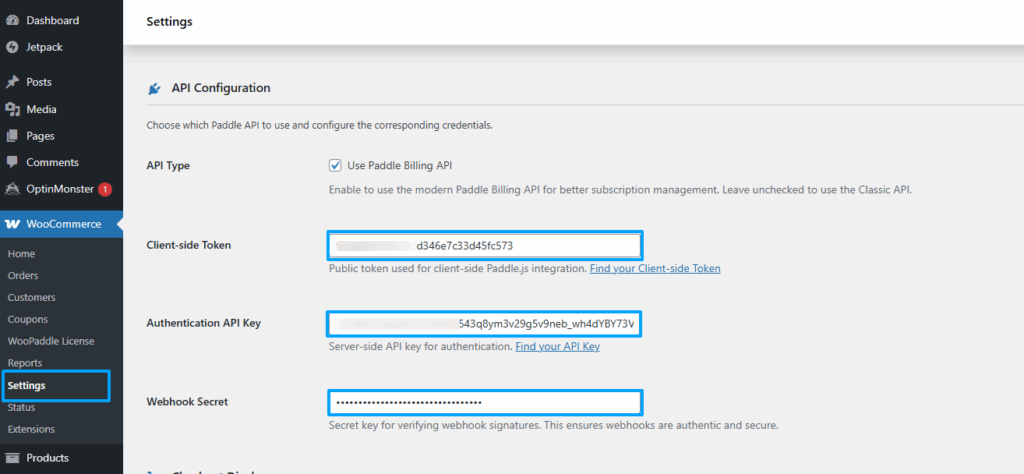
After clicking the Save changes button, your Paddle Payment Integration Is Ready
Your Paddle payment system is now fully active on your website using WooPaddle. You can start taking payments, new orders, and subscriptions without any hassle.
Go ahead and try a quick test payment to see it in action!
 SHAMIM HASAN